Diamond Problems

Continuing the theme of blogging I didn’t get around to last year, here are some diamond problems for INBs.

If you haven’t heard of these before, the solution to these puzzles consist of four numbers. The top number is the product of the left and right numbers, and the bottom number is the sum of the left and right numbers. The puzzle consists of the diamond with two numbers filled in; the task is to determine the other two numbers.

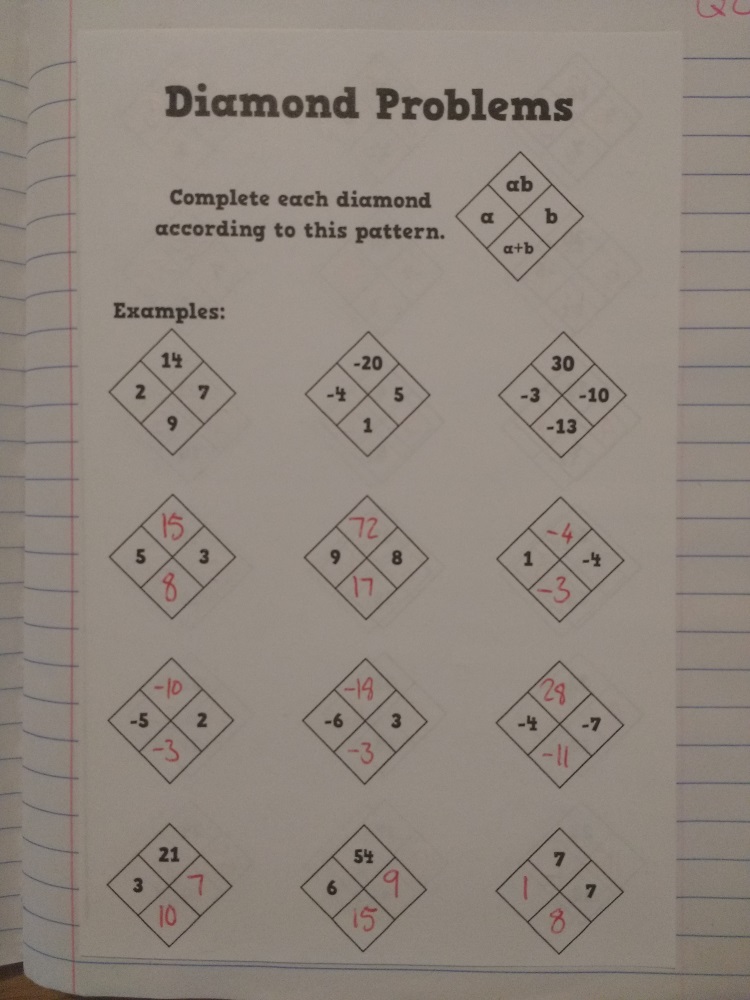
If the puzzle gives the left and right numbers, the solution is pretty simple. Even so, I provided some of these on the first page so students could understand the problem before moving on to the actual challenge: finding the left and right numbers when given the top and bottom.

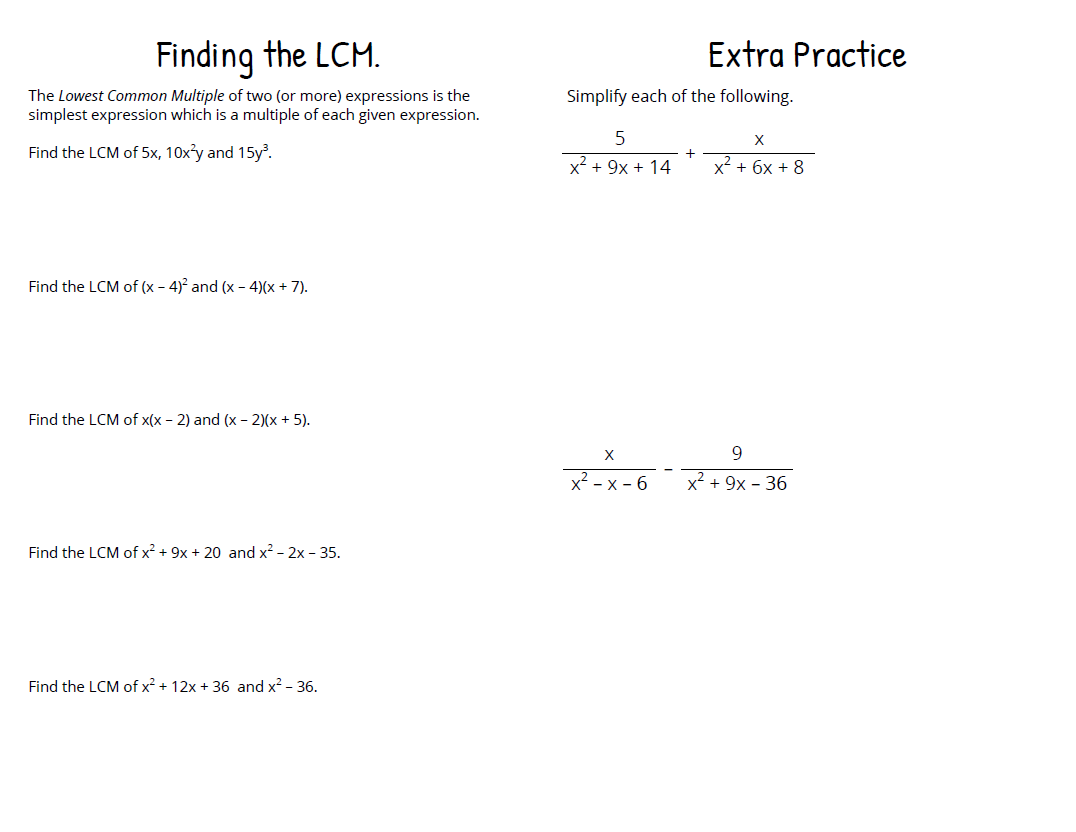
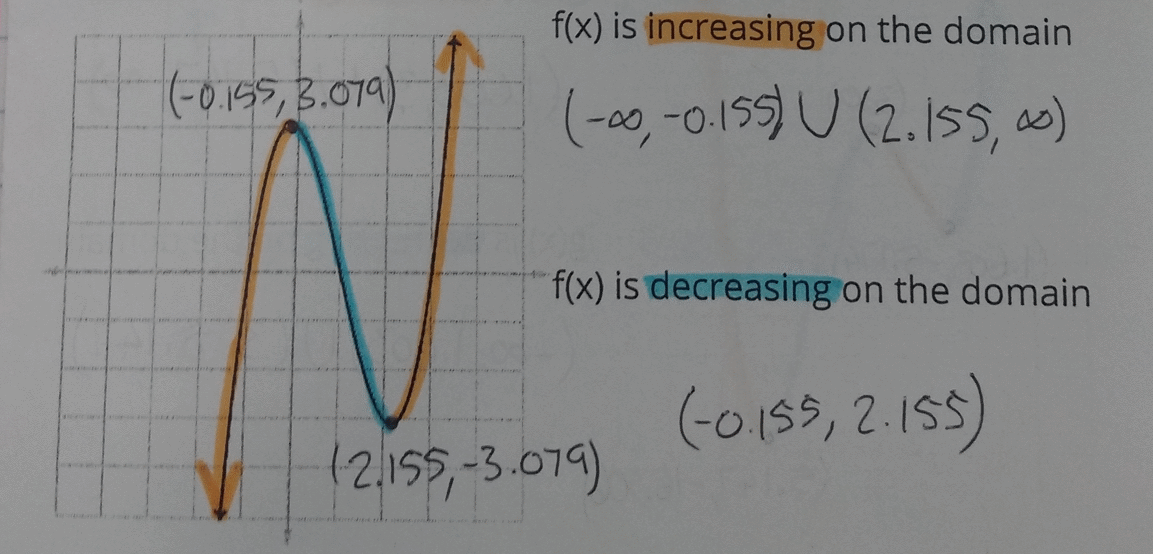
You may have noticed that the solutions to these puzzles are related to quadratics. For instance, the first example matches the factorization x2 + 9x + 14 = (x + 2)(x + 7).  The magic of these puzzles is that they start teaching kids this vital skill for Algebra without it being obvious that’s what happening.

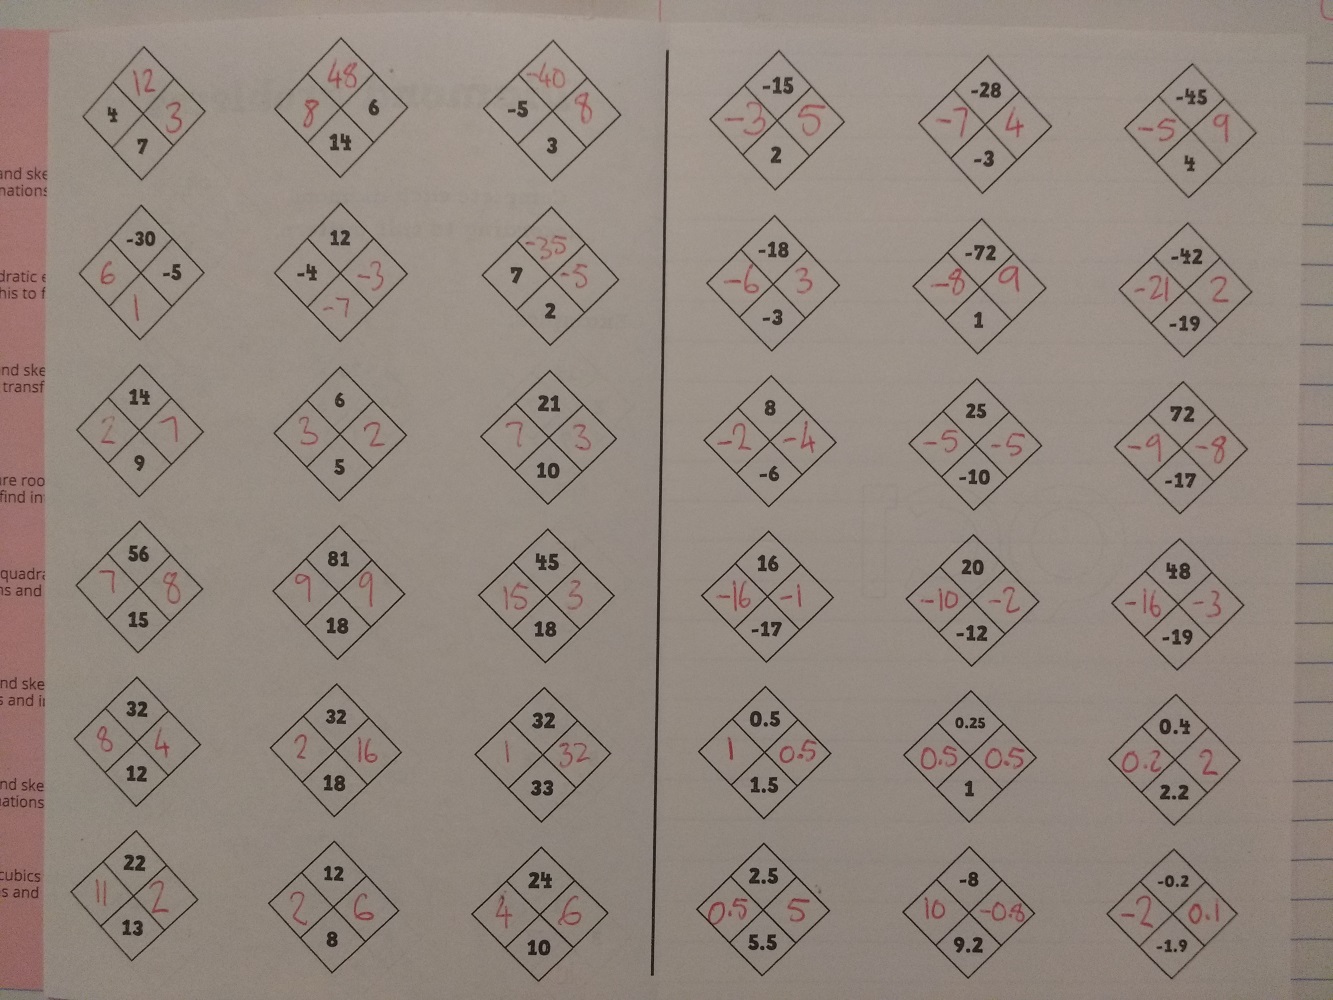
If you’re teaching middle school or even upper elementary school, I really recommend giving your students these puzzles. You can change the difficulty as you need, introducing negatives when students are ready, and decimals or fractions when you really want to up the challenge. The puzzle is a logical thinking problem which is not too difficult to understand, and ties directly in a skill needed in Algebra. As it happens, I used these in Algebra 2, because that’s what I was teaching, but I wish I’d known to use these puzzles when I used to teach 7th grade. Your students’ future Algebra teachers will love you for it.

Downloads are here, including blank versions for you to write in your own numbers.

There’s also a last-five-minutes activity I used a few times related to this. Once students know how the puzzles work, have a student invent their own puzzle and write it on the board for the rest of the class to solve. I had some (very competitive) students who were very determined to give their classmates a problem they couldn’t solve, and others who were equally determined to solve these problems.


Adding and Subtracting Rationals

These are the notes I wrote for adding and subtracting rational expressions last year in Algebra 2.

On the first page, I wanted to make the connection between rational expressions and fractions explicit, so I started with a reminder of how to add and subtract fractions. The two examples were chosen deliberately; the first only required changing the denominator on one fraction, while the other required changing both denominators. Students need to deal with both types of problems with rational expressions.

The next part introduced two simple problems, with only one denominator being changed between them. They are both problems that require simplifying, as I wanted to emphasize the need to do this from the start. (Students had already seen how to simplify rational expressions and stating excluded values.)


The next page was about finding the lowest common multiple. I had students use a strategy which emphasizes the definition of the LCM, having them multiply by factors so that the two expressions are the same.

And finally, a couple of examples putting all of this together.

Downloads are available here.


Area of a Circle

Whether it’s polygons in geometry, or under a curve in calculus, I have a favorite way to explore area in class: cut up shapes made of paper and glue them back together in a new way. This time, I’m applying the idea to visually prove the formula for the area of a circle.

If it isn’t clear, the parallelogram-ish shape was originally the same as the circle at the top of the page, but its sectors have been cut apart and glued into the alternating up-and-down pattern that’s shown.

I printed eight circles to a page, and cut them into four sections so that each student could have two of them. There have been past years where I’ve had students draw and cut out their own circles to do this activity, which has the nice side effect of showing that students with different sized circles still get the same result. However, I decided this year that it was more important to get students into the activity quickly, so I gave them the template to use. Also, the sized circles I used (the radius is 1.35 in) seem ideal for fitting in a composition notebook.

You can download files for the circles here.

A few pointers on how to approach this lesson:

  • I wrote clear instructions on my board to only cut apart one circle. If you don’t emphasize this, you’re likely to have a kid who has to glue an extra circle back together unnecessarily.
  • Encourage students to get on with the task quickly. I find that while cutting and pasting shouldn’t take very long, students can drag things out if given the opportunity, and sometimes feel like they’re doing work even if the pair of scissors in their hand. Even the students who showed up five minutes early were told to get going the moment they entered the room, which set the tone for the following students.
  • Also encourage students to be precise with their gluing. Some of my kids had strange looking shapes that either curved down the page, or had large gaps between each sector and couldn’t fit the whole thing on their page.
  • Students will finish the gluing part of of their notes at very different times. I was prepared by having the notes finished in my notebook, so students could copy them as they needed. I also allowed them to take a picture of the notes on their phone to copy from, so they wouldn’t have to wait for another student to finish. Also, because students were finishing at different times, I had other work for students to go on with when they were done with the notes too.
  • I waited until most students had finished gluing before we discussed the meaning of the activity. I tried to prompt the students themselves to recognize what’s going on here so they could explain their understanding to the rest of the class; this worked to varying degrees in my different classes.

These notes include the formula for the area of a sector, but our justification of it is not included on this page. This post from a few years ago outlines how I like to introduce that concept.


Analyzing Polynomial Graphs

Here’s an INB page I created to introduce students to analyzing graphs of polynomials.

Each graph is repeated three times, so we can (literally) highlight different aspects of it. Luckily for me, Sarah is amazing at acquiring classroom supplies, so I have a lot of highlighters for students to use.

The first part was identifying the x-intercepts and the nature of each of the intercepts. I had students highlight the curve around each intercept, to emphasize whether they are simple intercepts, vertices (local minima or maxima) or inflection points.

As students did this, I tried to direct the conversation to figuring out why particular polynomials led to particular types of intercepts. This was actually really easy, as the class were asking and answering these questions without much prompting from me at all.

Next, we found the intervals for which each polynomial is positive, and for which they are negative. Having students visually represent the sections which are positive and negative really helped them in identifying those intervals.

I just (as in, while I’m writing this post) had an additional  idea to help with this part. If I’d given each student a card, they could place the edge of it along the x-axis so that only the positive parts of the graph were showing. They’d highlight those parts of the curve, then flip it over so they could highlight the negative parts of the curve.

Finally, they highlighted the sections which were increasing, and the sections which were decreasing. To find each local maximum and minimum, I just had to quickly teach them some differential calculus…

… just kidding. We used Desmos.

Joking aside, I do like using topics like this to start hinting at the math that students may be seeing in the future. I was able to explain that a big part of calculus is looking at the rate and direction of functions, with a particular focus on where functions are neither increasing or decreasing.

If you’d like these notes, downloads are available here.

I used https://www.graphfree.com/ to make the graphs. I know I’ve made my own graph sketching tool before, but it’s really only capable of parent functions and simple transformations of them, so GraphFree was exactly the tool I needed this time. (To be honest, the main reason I’m mentioning GraphFree here is I’d forgotten what GraphFree is called when trying to find GraphFree the other day, so I want to remember that GraphFree is called GraphFree. GraphFree.)

Following this, we did further practice using section 6.4 of the practice book I’m working on. Follow that link if you’d like to get those practice questions yourself – for free!


Perimeters of Polygons INB Page

I mentioned in my last post that students sometimes describe perimeter as the “outside of a shape” (as opposed to area being the “inside”.) Though it’s an easy answer to give, and an easy answer for a teacher to accept as being correct, I wanted to put my students’ understanding of perimeter on a more sure footing. I wanted to give students a clear definition, showing that when we use the perimeter, we’re talking about a length.

At the same time, the math involved in the perimeter of polygons is pretty simple: its the sum of the lengths of the sides. There’s a reason it’s introduced at third grade (in the Oklahoma standards, at least.) But while adding a set of numbers is pretty easy for a high school student, I wanted to layer in more challenge.

My students need to figure out the missing side lengths of the polygon before they can make that simple calculation. Or, they’ll get the perimeter and have to figure out something else. Given this unit has already covered theorems related to quadrilaterals, and the previous unit was on the Pythagorean theorem, special right triangles and trigonometry, I had lots of options of for how to make students determine the information they need.

Also, students complain all the time about word problems, which tells me they probably need more exposure to and practice with word problems. So I gave my students ten problems, for which they had to draw a diagram (as I hadn’t given them one) and show all their mathematical working.

Downloads are available here.